EC-CUBE 管理画面のデザイン関連を渡り易く
2015/11/16
⚠️投稿日または最終更新日から8年以上経過している内容です。
確認バージョン 2.13.4
EC-CUBE 管理画面のテーブルをわかりやすく に続いてECCUBEの管理画面ネタ
ページ確認のリンクを追加
ページ詳細設定とレイアウト設定の画面のテーブルにて、 名称|レイアウト|ページ編集|削除 と項目がありますが、 実際のページを確認できるリンクがないので使いづらいです。
ということで、確認という項目を追加しました。

/data/Smarty/templates/admin/design/index.tpl /data/Smarty/templates/admin/design/main_edit.tpl
<h2>編集可能ページ一覧</h2>
<div class="btn addnew">
    <a class="btn-normal" href="?device_type_id=<!--{$device_type_id|u}-->"><span>ページを新規入力</span></a>
</div>
<table class="list">
    <col width="60%" />
    <col width="10%" />
    <col width="10%" />
    <col width="10%" />
    <col width="10%" /> <!-- ←←←を追加 -->
    <tr>
        <th>名称</th>
        <th>レイアウト</th>
        <th>ページ詳細</th>
        <th>確認</th> <!-- ←←←を追加 -->
        <th>削除</th>
    </tr>
    <!--{foreach key=key item=item from=$arrPageList}-->
        <tr style="<!--{if $item.page_id == $page_id}-->background-color: <!--{$smarty.const.SELECT_RGB}-->;<!--{/if}-->">
            <td>
                <!--{$item.page_name}-->
            </td>
            <td class="center">
                <a href="./<!--{$smarty.const.DIR_INDEX_PATH}-->?page_id=<!--{$item.page_id}-->&device_type_id=<!--{$item.device_type_id}-->" >編集</a>
            </td>
            <td class="center">
                <!--{if $item.filename|strlen >= 1}-->
                    <a href="?page_id=<!--{$item.page_id}-->&device_type_id=<!--{$item.device_type_id}-->">編集</a>
                <!--{/if}-->
            </td>

            <!-- ↓↓↓を追加 -->
            <td class="center">
                <a href="<!--{$smarty.const.ROOT_URLPATH}--><!--{$item.filename}-->.php" target="_blank">確認</a>
            </td>
            <!-- ↑↑↑を追加 -->

            <td class="center">
                <!--{if $item.edit_flg == 1}-->
                    <a href="javascript:;" onclick="fnTargetSelf(); eccube.fnFormModeSubmit('form_edit','delete','page_id','<!--{$item.page_id|escape:'javascript'|h}-->'); return false;">削除</a>
                <!--{/if}-->
            </td>
        </tr>
    <!--{/foreach}-->
</table>
レイアウト設定画面からブロック編集に行けるように
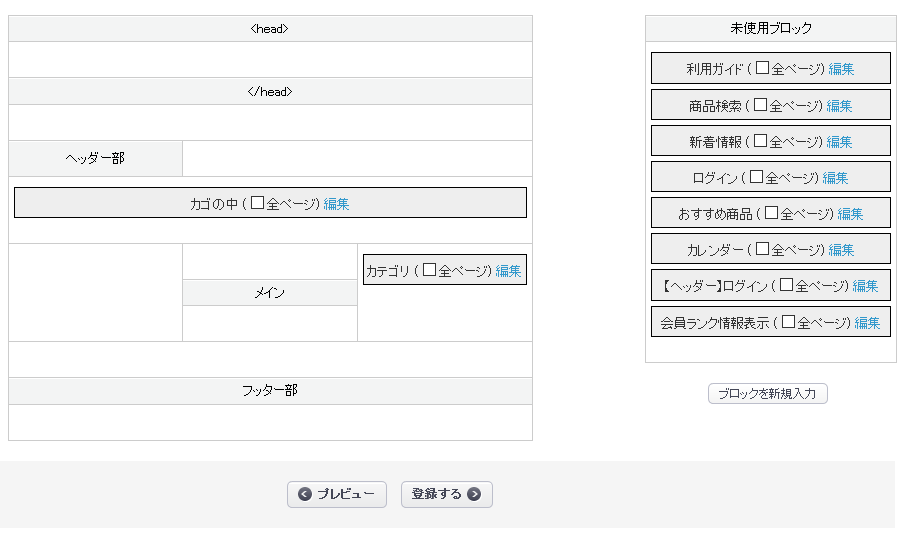
続いてレイアウト設定画面のブロックUI。 ブロックはドラッグアンドドロップで組み替えできるので、 とてもいいのですが、ブロックの中身を変更するには、ブロック管理からいちいち探さないといけません。 レイアウト設定画面からブロック編集画面へのリンクを貼れればいいなーと思ったのですが、楽ちんで出来たので紹介。
/data/Smarty/templates/admin/design/index.tpl
<!-- ★☆★ HEADタグ内テーブル ☆★☆ -->
<td colspan="3" id="<!--{$arrTarget[$smarty.const.TARGET_ID_HEAD]}-->" class="ui-sortable">
    <!--{assign var="firstflg" value=false}-->
    <!--{foreach key=key item=item from=$arrBlocs name="bloc_loop"}-->
        <!--{if $item.target_id == $arrTarget[$smarty.const.TARGET_ID_HEAD]}-->
            <div class="sort<!--{if !$firstflg}--> first<!--{/if}-->">
                <input type="hidden" class="name" name="name_<!--{$smarty.foreach.bloc_loop.iteration}-->" value="<!--{$item.name}-->" />
                <input type="hidden" class="id" name="id_<!--{$smarty.foreach.bloc_loop.iteration}-->" value="<!--{$item.bloc_id}-->" />
                <input type="hidden" class="target-id" name="target_id_<!--{$smarty.foreach.bloc_loop.iteration}-->" value="<!--{$item.target_id}-->" />
                <input type="hidden" class="top" name="top_<!--{$smarty.foreach.bloc_loop.iteration}-->" value="<!--{$item.bloc_row}-->" />
                <!--{$item.name}-->
                <label class="anywherecheck">(<input type="checkbox" class="anywhere" name="anywhere_<!--{$smarty.foreach.bloc_loop.iteration}-->" value="1" <!--{if $item.anywhere == 1}-->checked="checked"<!--{/if}--> />全ページ)</label>
                <a href="bloc.php?bloc_id=<!--{$item.bloc_id|h}-->&device_type_id=<!--{$device_type_id|h}-->" >編集</a> <!-- ←←←を追加 -->
            </div>
            <!--{assign var="firstflg" value=true}-->
        <!--{/if}-->
    <!--{/foreach}-->
</td>
<!-- ★☆★ Headタグ内テーブル ☆★☆ -->
似たような記述が13箇所ありますが、編集リンクを追加するだけでOKでした。